Home / How to Get Glowing Skin / Tagged: best sheet mask

THE COMPREHENSIVE, ULTIMATE, DETAILED, NERDY SKINCARE ROUTINE GUIDE FOR SKIN ENTHUSIASTS: Part 4 of 4

THE  COMPREHENSIVE, ULTIMATE, DETAILED, NERDY SKINCARE ROUTINE GUIDE FOR SKIN ENTHUSIASTS: Part 4 of 4

Part 4. Restoring & Replenishing

If you are just joining us for the first time, please read the previous posts about the cleansing part of the routine.  Skincare routines are largely built around cleansing, which includes exfoliation (deep cleansing) and restoring and replenishing.  We also discussed choosing skin goals including that of anti-aging and anti-inflammation on top of your personal goals to set as targets when choosing products for your personal skincare routine. 

Replenishment, Restoration, Hydration 

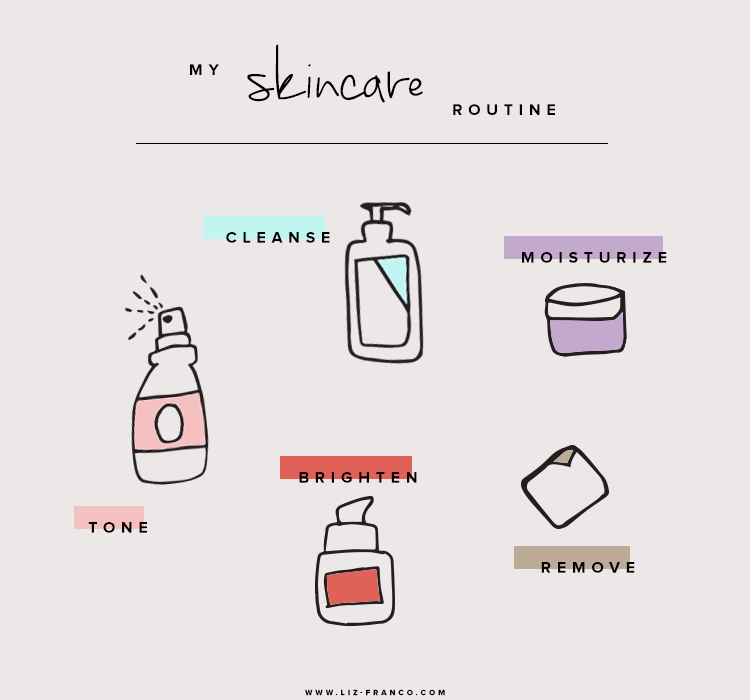
Replenishment, Restoration, Hydration:  Ok, so now that your pores are clean and fresh, it’s time to replenish and moisturize your skin. (Did you miss the cleansing steps before this?  See here.)  I like to use a potent mix of antioxidants in these steps to fight free radicals.  These are the products in which you should be investing. Here are the ingredients you should look for as you choose your products.  Most of the time in beauty, you really do get what you pay for as the more effective ingredients create a higher demand and drive costs up. As for the sequence of your routine, when in doubt, go in order of the most water based product that’s transparent, watery and light, to the thickest, more oil-based, creamy, heavier product.  The idea is that the smaller molecules should go on first to be absorbed into the deeper layers while the bigger molecules serve more as an occlusive to keep moisture locked in. 

  1. Preparing/ setting the skin:  Apply toner here (non alcoholic, skin prepping.) You can choose to replace with a glycolic acid/ salicylic acid pads, an essence or mist here. Some also like witch hazel, or I sometimes recommend a rose water based toner, a pH balancing toner, or a skin-relieving toner,  if none of your products in the routine have it. Determine the right products by your skin goals.  
  2. Apply essences, ampoules and serums here- in that order. If you are layering on multiple products here, remember: clearest to creamiest or smaller molecules to bigger molecules. Ampoules penetrate deeper so they go before serums.  The more translucent and watery textures should be applied first. It is totally OK to layer. People ask whether you should wait before applying the second or third serum and technically, yes, you should give it a minute to settle in, but it’s OK to pat on. All of your products in these steps should have your active ingredients that hit your anti-aging skin goals- all your vitamins, peptides and antioxidants.  If you are using potent but effective ingredients like Vitamin C or retinol that you can be sensitive to, be sure to apply them at night. Some people advise not using the two together, but that also depends on how sensitive you are. The reason some advise not to use them together or before exposing your skin to the sun is that these can all cause irritations.  It’s important to know your skin and build up to using powerful actives over time.  Again, it would be wise to always have a Mask Moments mask handy to soothe and calm any inflammation in case you flare up from irritations. You’ll be hitting your anti-inflammation skin goal at the same time.  
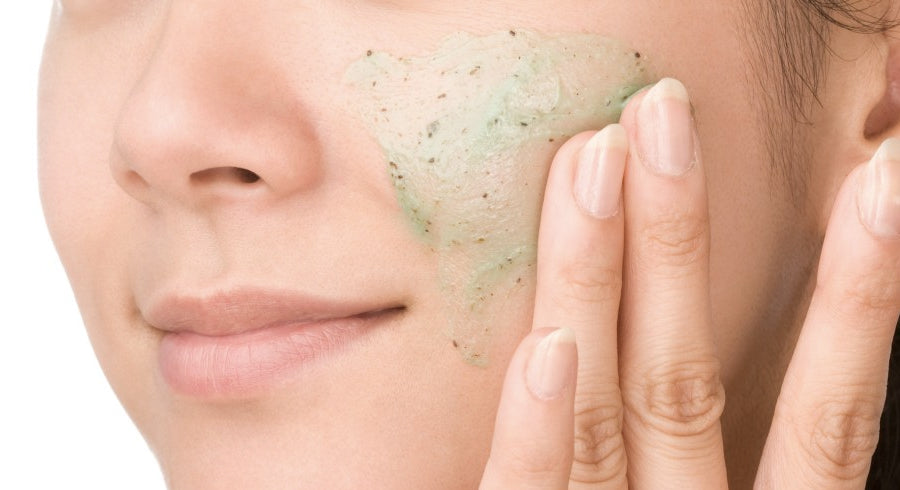
  3. Restore that nutrition and hydration with your Mask Moments! This is the MAIN EVENT of your routine! We recommend masking minimum one time a week if you are not in the habit, but generally, two to three times a week is recommended.  Celebrities and women in Asia mask daily and before big events so the make up can go on smoothly. If you are using a cheaper, paper/fabric mask, do not leave on long. Ten minutes should suffice before the fabric dries. Definitely don’t sleep in it. If you are using Mask Moments, you can leave it on as long as the mask takes to seep into your pores and absorb. You will see the mask begin to thin as the antioxidants, peptides and actives transfer.  In fact, applying Mask Moments at this step will help the actives from your serum in the previous step absorb into your skin as well. The mask also has a serum in it that  provides a deeper level absorption of nutrition restoration and hydration replenishment. If you are using Mask Moments masks, it’s highly likely that this is the only anti-inflammation step in your routine, which is key to anti-aging. These work like home beauty facials to plump your skin, delivering results and benefits of a spa right at home for a fraction of the price- what’s NOT to love? Also, if you are using any jade rollers, whip it out here to help circulation.

4. Occlusives: Seal off all that goodness with a good moisturizer that can act as a barrier. You want to create this layer to lock in moisture.  Moisturizing important step after masking that people often forget! Some people wash off the mask, which defeats the purpose! What you want to do is to apply an occlusive to keep from evaporating so we can lock in the moisture and nutrition you restored in the previous steps.

  • Lotions/Emulsions are the thinner, lighter moisturizers.  If you have oilier skin, you may prefer using a lotion as the only occlusive.
  • Thicker creams (usually night creams are thicker) go here and are applied after. Oilier people prefer water based creams, and drier skinned people prefer heavier, thicker, oil-based creams.

5. If you are using a separate eye cream and lip, cream, you can apply at this step.

6. If you are using any face oils, they go on last, as the last occlusive layer. I would only use oils during dry months, once a week, or if I’m reapplying on a flight.

7. Suncare: This is a daily must-do step that’s part of the day time routine. Use at least an SPF30 with PA+++.  I always recommend the strongest PA++++  as that indicates stronger protection from UVA, which ages skin. The sun is out every day, even when it’s cloudy and even if you are indoors with windows! There’s also blu-ray from our monitors and phones!  At night, be sure you take the time to thoroughly cleanse as sunscreens clog the pores.

 8. Any make up like primers, B.B. creams, or tinted moisturizers would be in this last step as you begin to apply your make-up.

And there you have it!  While these are general guidelines for the proper skincare routine, beauty is personal and depending on your skin goals, your products will differ.  Make sure your products target anti-aging, anti-inflammation and the goals you want to target.  Build your personal routine around these products based on the guides we provided around cleansing and restoring/replenishing.  Remember that any routine is only effective when you are consistent and stick to your products for at least one skin cycle.  Masking should also be incorporated REGULARLY into a routine as opposed to using as a special occasion treat. Mask Moments will help target restoration and replenishing for anti-aging as well as treating inflammation. Skincare maintenance is a routine habit, and we keep our customers on track with our subscriptions (non subscription products are available too).

Ready to try the newest specialty face mask on the market? Mask Moments is made of absorbent, anti-inflammatory coconut jelly and is a direct-to-consumer beauty masks subscription service. 

Try it for $1 today 


THE COMPREHENSIVE, ULTIMATE, DETAILED, NERDY SKINCARE ROUTINE GUIDE FOR SKIN ENTHUSIASTS: Part 3 of 4

THE  COMPREHENSIVE, ULTIMATE, DETAILED, NERDY SKINCARE ROUTINE GUIDE FOR SKIN ENTHUSIASTS: Part 3 of 4

Part 3. Cleansing & Exfoliation

Ok- glad you're still with us.  Now for the actual steps!

Skincare Routine Categories: Cleansing

The two overarching facets of your beauty routine should consist of cleansing and restoring (Part 4). There are three parts to cleansing:

Clean thoroughly and always be gentle!

 1. Remove Make-up.  Products are oil based, water based or cream based. Lip and eye removers are recommended if you use a lot of color cosmetics like mascara or lipstick or foundation that are hard to remove. You also have melting removers and oil based removers infused with active ingredients. The idea here is that oil removes oil.

2. Wash your face. Use lukewarm, running water. Wash morning and night, and if you work out during the day, make sure you wash after you sweat! Choose a gentle wash whether foam cleansers, milk cleansers that are recommended for drier skinned beauties or non-foaming cleansers.  If you are targeting acne, I recommend looking for salicylic acid in your wash and/or cleansers that help balance your skin pH. If you are washing at night, make sure you remove the SPF and make-up thoroughly. Make-up wipes do not count! They have their purpose but should not substitute washing your face.

3.Deep Cleansing (Exfoliation). Exfoliation is the idea of removing dead skin cells which is key for deep cleansing and reducing the appearance of dull skin.  There are three different ways we can approach the process:

 A. Physical friction: the idea of using friction to remove dull skin by using a scrub with micro-beads, a gommage, brushes, etc.  (Think buffering, like sandpaper.) For scrubs, I advise using the smallest, roundest beads possible as there are many scrubs containing sharp, coarse and uneven ingredients that will cause small tears that are not visible to the eye but are damaging. Gommage is a drying paste that also uses friction to remove dead skin cells. There are many types of brushes from mechanical to manual, but the idea here is to be as GENTLE as possible, as these methods can often be abrasive.

B. Chemical method: (AHAs, BHAs, glycolic acids):  the idea of dissolving dead skin cells, so that the softer, younger-looking skin underneath is revealed. The advantages of this type of exfoliating is that it will unclog your pores. If your main focus is on the skin’s surface (and you don’t suffer from sensitive skin, redness or blocked pores), an AHA exfoliant is a good choice if you are exfoliating as a part of the deep cleansing process. BHA and glycolic acid are often contained in products meant to be used during your routine as daily exfoliators.  For example, you may have AHA in your face wash or in your creams. Sensitive-skinned beauties can avoid using them as frequently. In fact, if you are extremely sensitive, I would avoid chemical exfoliators altogether as certain AHAs and BHAs can be powerful and cause irritation and weaken the skin barrier. I like to use spot treatments with salicylic acid (a BHA) to treat blackheads as well as the occasional pimple/ acne.

C. Biological method: similar to the way chemical exfoliants work except enzymes break down protein to remove dead skin cells to reveal smoother skin underneath.  This is personally my favorite way of exfoliating as it’s the most natural way to break down dead skin cells and most recommended for sensitive skinned beauties.  However, this is also the most difficult method to handle at home and therefore less available on the market, as the effectiveness is temperamental and easily affected by the environment, pH balance, temperature, exposure to sunlight and the method in which it works.  While best applied by an esthetician, the trick is to use a powder with a brush for the enzyme powder to lather the right amount (only a small amount is needed and even less water to lather correctly.) Then, allow steam to settle and give the enzyme time to work.  I recommend doing this in the shower. Alternatively, you can use a warm cloth/towel to put over your face.  After everything has dissolved, wash off with lukewarm water.  

How often should you exfoliate?

Generally, the rule of thumb is to deep cleanse one to three times a week.  Exfoliating properly will really give you that glow.  There are exfoliating pads and leave on exfoliating products meant to be used as part of your daily routine, but please use these with care.  If you have dry, sensitive skin, less will be more for you, as long as you can be consistent. Taking time to experiment is key so you know what works for you. Those with oily or acne-prone skin may benefit from exfoliating more often, and if you have mature skin, regular, routine deep cleansing should suffice. 

Pro Tip: Try using Mask Moments on the days that you exfoliate. The combination of deep cleansing and restoration will give you that ultimate glasskin glow! Get on a Mask Moments subscription plan to help you stay consistent with both exfoliation and restoration/ replenishing.

Try it for $1 today


Masks for Masks

Masks for Masks

A friend recently reached out to ask about mask productions on behalf of someone in the business. Halfway through the conversation, we realized that she was not talking about the hydrating sheet masks or face masks but rather, about protection masks (PPEs- like the N95 or three-ply dental masks) for COVID19! 

The word “mask” has exploded on search terms and in the media lately with what’s been going on with corona, so today, I want to talk about (sheet/ face) masks for (protective) masks! 

I’ve been in Seoul, Korea the last two months and EVERYONE has been wearing protection masks to shield their face, especially since we are past the lockdown phase here and a high percentage of people have returned (albeit slowly) to fairly normal lives.  The idea is to create an extra layer of barrier to prevent the spread of contamination- both from lowering the chance of passing and catching germs including coronavirus that travel through droplets. Earlier in the US, whether one should or should not wear masks was up for debate, but it’s becoming more commonplace across the cities. I’m sitting in a fairly well occupied cafe as I write this but the staff have been turning away anyone not wearing one of these masks.

While these masks serve as preventative equipment, there are unintended side effects that affect your skin. A few weeks into wearing these masks regularly, I started getting itchy on the areas where the mask touched my face, and soon enough, I started seeing a breakout right along the outline of the masks!

You’ve seen the pictures of healthcare workers who have had to wear tight fitting masks for long periods. They have sores, skin tears, indentations from wearing PPEs for hours. While it provides an extra layer of protection, wearing these tight masks will increase dryness, irritate sensitive skin, and can cause acne. Studies also show that this can increase risk for developing infections of the skin (bacterial, fungal, viral) from poor barrier function and open sores.  And when you have damaged skin, the masks may not seal properly, increasing exposure to the coronavirus. Over 97% of healthcare workers on the frontline will experience skin issues! 


If you are dealing with this or know someone who is, please take a Mask Moment! The friction from the PPE (masks and goggles too) along with the humidity trapped inside the mask makes your skin drier. The fact that the weather has been changing (aka allergy season) does not help! 

For relief, the idea is to focus on strengthening skin barrier, hydrating your skin and relieving inflammation and redness.

Here are the DO’s and DON’Ts!

DO NOT:

  1. Wear heavy makeup. Instead, skip the heavy foundation that can clog pores and worsen acne. 
  2. Sleep in makeup and be sure to remove it as soon as you can. (This is true for all times, actually!)
  3. Exfoliate too hard but go easy on the overly physical kind of exfoliation. The friction from the masks can cause microtears in the epidermis and you don’t want to be exacerbating the area with scrubs or gommages. I would stick to enzyme washes if you must exfoliate.
  4. Touch your face!! And please wash your hands before applying anything!
  5. Put on anything you might be sensitive to. Even if you use it in your normal skincare routine, this may be the time to take a break from retinoids or hydroxy acids or strong vitamin C’s.  You can always come back to them once you recover but avoid anything you are sensitive to during this time.

DO:

  1. Use hydrating serums with active ingredients, morning and night! 
  2. Lubricate the area with petroleum jelly before putting on protective gear.
  3. Frequently apply an occlusive agent (lotions, moisturizers, oils) to prevent water loss.
  4. Remember to apply lip balm for chapped lips.
  5. Use Mask Moments for hydration, restoration, relief from inflammation and redness. Our masks have ALL the ingredients that are your best friends right now: glycerin, hyaluronic acid, vitamin B5. And both the niacinamide and biocellulose (coconut jelly) will help reduce inflammation and redness. 

Know any healthcare worker who can use Mask Moments?  Nominate a hero to thank them for their service and we will select a winner everyday throughout the rest of April to receive a FREE mask to offer some relief as a sign of appreciation! 

Here’s how it works:

  1. Follow our IG account @maskmoments and tag your hero in the healthcare field on our post.
  2. Have them FOLLOW our account. Increase your chance by DMing us your stories and pictures. Multiple people voting for the same person will also count towards the entry.

#maskmoments_transformations